
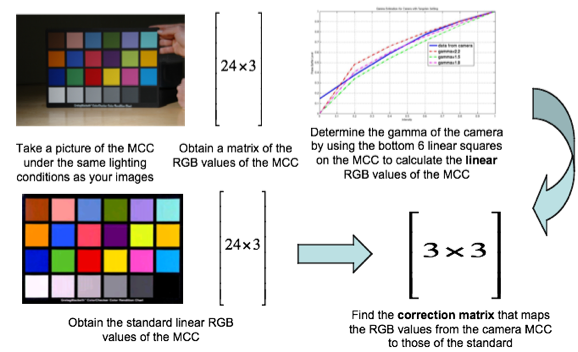
The MCC is a standard and has a 24x3 matrix associated with it containing its RGB values. Using a least-squares estimation, the linearized 24x3 matrix found from the picture can be compared to the standard 24x3 matrix and a 3x3 matrix can be found that maps it to the standard. This is our 3x3 correction matrix that is used to correct any images taken by that camera under those conditions.
One interesting thing it so compare the 3x3 correction matrices found for each setting with a 3x3 identity matrix. If the post-processing done by the camera was perfect and the illuminant setting matched the conditions of the illumination, the correction matrix calculated would be an identity matrix, i.e. the post-processing done by the camera would perfectly match the photographed MCC to the ideal one. This fact is demonstrated with the image taken under the tungsten setting and its corresponding 3x3 matrix. Because the illuminant setting most closely matched the actual illumination in this case, the correction matrix is relatively close to the identity matrix. However, for the fluorescent and daylight, because the settings do not match the actual illumination used, the matrices are further from unity.
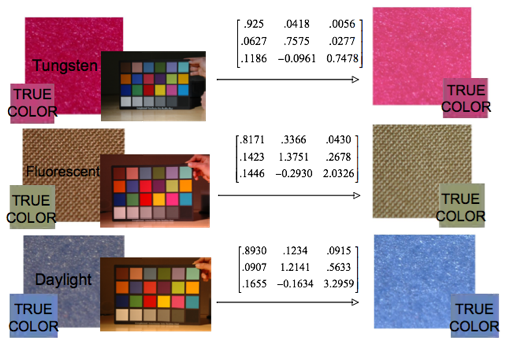
Below are images of three different colored fabrics. All pictures were taken under tungsten illumination, but each was set to a different illuminant setting on the camera: the top was set to tungsten, the second to fluorescent, and the bottom to daylight. For comparison, a patch of the true color, as determined in Investigation #1, is posted next to each fabric. After each image was taken, it was passed through the 3x3 correction matrix for its respective illuminant setting. The final, "corrected" image is shown on the below right. These corrections do improve the images and bring them closer to the true colors of the fabrics.
The second portion of our project investigated how to "fix" an image of a piece of fabric when it has already been captured and altered by a camera. This is an important step for anyone concerned with accurately rendering a color but who does not have access to a spectrophotometer. Without such an instrument, it would be impossible for someone to follow the steps explained in Investigation #1. However, if you had the much cheaper and more accessible alternative, a Macbeth Color Checker (MCC), you could follow the steps we carried out in this portion of our project and achieve a more accurate representation of your color. As we'll show below, a photo of the Macbeth Color Checker, when taken under the same conditions as the fabrics, gives you all the information you need to correct for any color misrepresentations.


The way we calculated the error was to look at the difference between real RGB values (the “true color”) and the photo RGB values before and after correction respectively. We expected to see an overall improvement in color rendition after the appropriate correction.
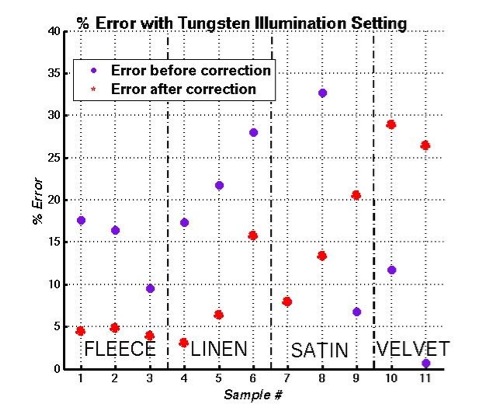
Indeed, most of the samples showed an improvement in % error. In particular, fleece and linen errors were brought down by 5%-15% to a final result of below 5% error in some cases. However, some satin samples showed little to no improvement, and velvet colors were made overall worse by using our correction algorithm.


Each fabric sample was corrected using the method outlined above, and the results were grouped by fabric type. Error percentage for each fabric was calculated before and after correction.
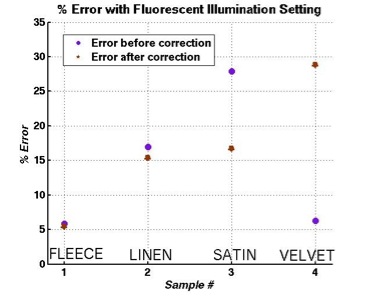
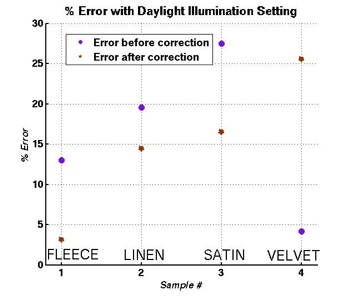
A similar pattern was observed for the cases where the camera was programmed to the Fluorescent and Daylight illuminant settings: fleece and linen certainly showed good improvement after correction, while the color of the velvet sample became even more inaccurate. The satin sample that is shown in the following 2 plots did, in fact, have improved results, but the other 2 samples did not.
Sources of error
Besides the fact that the sRGB gamut is limited and fabric colors could be completely outside of this gamut, there are several other sources for the errors that we are seeing above, and we also tried to speculate on the discrepancy in the effectiveness of the correction algorithms between the different types of fabric.
1) The pictures of the Macbeth Color Checker were not taken at the exact same angle as the pictures of the materials, so light was not uniform across the samples. Therefore, it is possible that the correction 3x3 matrix for the camera may not have been completely accurate
2) Spectrophotometer measurements were not taken from the exact same angle and under the exact same illumination angle as pictures taken with the Nikon camera, so inconsistencies may arise from this fact too, especially since the results of the 2 different measurements are compared to each other in order to obtain the error plots.
3) Our speculation is that the difference in texture of the test fabrics causes them to be more or less sensitive to the above errors, and thus to amplify the effect of these errors to a lesser or greater extent. Upon visual inspection of the fabrics, it is quite obvious that the reflectivities of satin and velvet vary widely with the angle that they are viewed at - as opposed to fleece and linen which have relatively even reflectance across all viewing angles.
4) One area for improvement is the formula for error calculation: we could look at the errors in R, G and B separately as opposed to averaging them out, and potentially see patterns which are currently overlooked.


The main experimental step in this process is to take a picture of the Macbeth Color Checker under the exact same conditions (illuminant, camera settings, angles, etc) as the pictures of the fabrics were taken. In the process flow chart below, the picture of the MCC was taken under tungsten illumination and with the tungsten illuminant setting on the camera. From this image, a 24x3 matrix can be generated containing the RGB triplets for each of the 24 color patches on the chart. Then, to determine the gamma that was applied by the camera, the RGB values of the bottom six squares of the MCC were plotted, as shown to the right. These bottom six squares are linearly spaced in RGB values on the standard MCC, and thus, by fitting a gamma to them, it is possible to determine the inverse gamma that needs to be applied to make the nonlinear values that come from the camera linear.
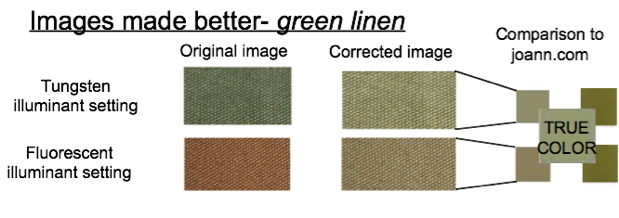
Below are more detailed results for one of the fabrics, a piece of olive green linen. On the far left are images taken with the tungsten and fluorescent settings before any correction. To the right are the images with our correction matrix applied to them. Finally, the corrected colors for each setting are compared with the colors found on joann.com [5] and the true colors we found in Investigation #1. Our corrected colors are much closer to the true colors in both cases.
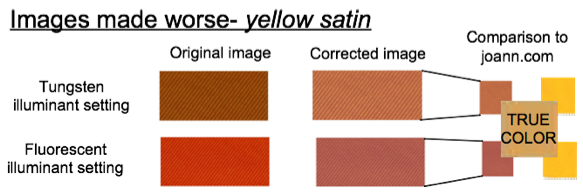
Our image correction did not always work to improve the colors of the fabrics, however. Possible sources of error are explained below; here, we will just present one of the fabrics that was made noticeably worse by the "correction". Below are the results for a piece of yellow satin. Both images, the one taken with the tungsten illuminant setting and the one taken with the fluorescent setting, become more red after the correction.


