 Figure
1
Figure
1Experiment
In order to test for whether or not the camera enforces the Gray world assumption, images displayed under different illuminants must be made available to the camera. Instead of actually filtering the light source, I decided to generate images of different color casts and displaying it on the computer monitor. This way, I am acting as the light source and the monitor is providing the input to the camera.
In my experiment, the primary image used was that of the Macbeth ColorChecker image we saw in our Rendering.m tutorial. The methods of generating the Macbeth ColorChecker was largely derived from the tutorial but several key modifications had to be made.
Before we start taking pictures with our digital camera, we had to first find out whether the camera was performing any kind of automatic gamma correction and undo this process before proceeding with further analysis. Further info on Camera Gamma estimation, camera settings, and lighting conditions use to take the pictures, can be found here. Camera Gamma Estimation and Camera Settings
Another thing we had to do was to be able to redisplay the image captured by the camera in a similar fashion as we displayed the original Macbeth ColorChecker. Thus I wrote a function to take the middle sections of each colored square and converted from rgb format to colormap indexed format. reindexImage.m
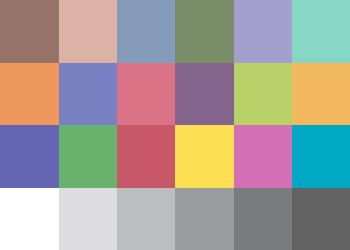
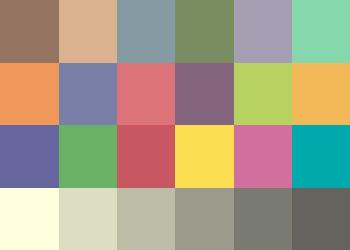
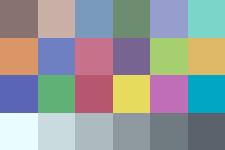
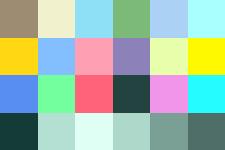
To begin the experiment, I wanted to see if we can notice any evidence of the camera enforcing the Gray World assumption by taking a photo of the Original Macbeth ColorChecker and comparing it to the same image that has been Gray World enforced. Below, we have three images, Figure 1, which is the Original Macbeth, Figure 2, the Gray World enforced Macbeth, and Figure 3, the Camera Macbeth.
Figure
1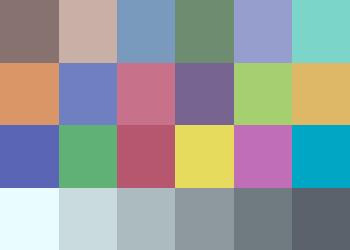
 Figure
3
Figure
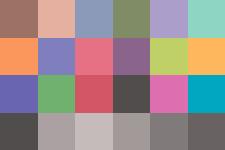
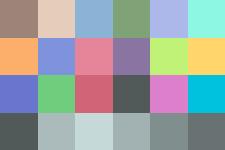
3This next set of experiments involve adding different colored filters to the Macbeth ColorChecker. For this experiment, I would like to simulate the effect of having different colored illuminants placed on the Macbeth image and using this as the input to the Digital Camera. To achieve this, I placed a red and yellow cast on the image by multiplying the corresponding color components with a scale factor of 1.5. More specifically, to place a red cast on the image, I multiplied the red color component by a factor of 1.5 and then rescaled everything to fall within 0 and 1. This will provide an effect of intensifying the red color component of the image to be 1.5 times greater, thus simulatinging the effect of shining a red light on the image. Similarly for the yellow cast, the red and green color components were multiplied by 1.5 and then everything rescaled back to fall between 0 and 1. The matlab script, generateMB.m was created to perform this operation.
Below are the images involved in this experiment.
Red Casted Macbeth
 Yellow
Casted Macbeth
Yellow
Casted Macbeth
Camera Red Macbeth
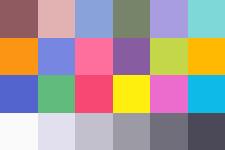
 Camera
Yellow Macbeth
Camera
Yellow Macbeth
GW Red Macbeth
 GW
Yellow Macbeth
GW
Yellow Macbeth
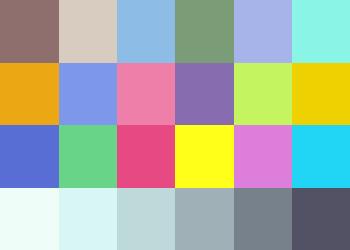
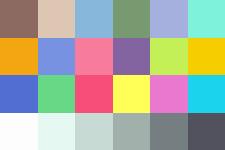
Now, to further isolate the effects of possible Gray World enforcement, I decided to alter the Macbeth ColorChecker by taking out the top three brightest color patches and replacing them with darker patches. The patches with the highest luminance values were found and then replaced by either (0,0,0) or darkened with a factor of 0.4. I found that surface 16, 19, and 20 had the highest luminance, with values of 62.6682, 96.0867, and 65.7920, respectively. Thus, I decided to black out surface 16 and 19, and darken surface 20 with a scale factor of 0.4. The reason that surface 20 was not blacked out as the others is because I wanted to provide a differentiable level of color contrast between adjacent color patches. Since surface 19 and 20 are adjacent, they cannot have the same RGB values. The MATLAB Script generateMB2.m was created to perform such a task. Once the high luminant surfaces were darkened, I used my Matlab script, GWbalance.m, which takes in an indexed image, to enforce the Gray World assumption on this image. This image is the final input to the camera and the results are shown below.
Red Cast
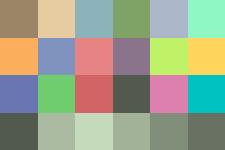 Yellow
Cast
Yellow
Cast
Camera Red Response
 Camera
Yellow Response
Camera
Yellow Response
GW Red Response

 GW
Yellow Response
GW
Yellow Response
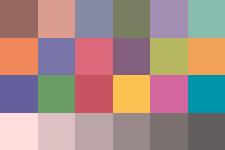
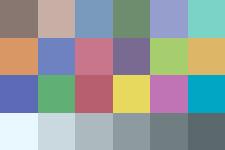
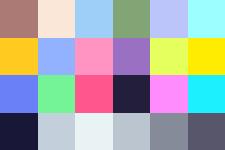
This experiment involves generating surfaces of constant rgb intensities throughout the entire surface. I've included a constant dark red, and a constant dark blue surface to perform the experiment. The script used to generate these constant dark surfaces is generateMB3.m. If the camera does indeed enforce the Gray World assumption, then these surfaces should become grayish in color. I chose this experiment because there is no sense of any kind of specularities in these dark colored images. Just to make things more interesting, I decided to take a real world image of a blue chair. Since the chair itself, unlike the monitor images, does not contain any types of light sources, I had to leave the lights on for the chair photo session. I took one with the flash on and one without the flash. The results are actually quite revealing.
The final pair of photos are those of the same dark red and dark blue surfaces from the monitor, but this time taken by the camera with the lights on.
Constant RED

 Constant
BLUE
Constant
BLUE
Camera RED (lights off)
 Camera
BLUE (lights off)
Camera
BLUE (lights off)
Chair (Flash on)
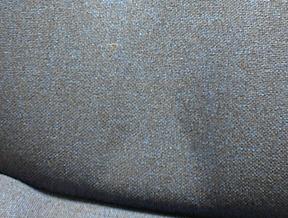 Chair
(Flash off)
Chair
(Flash off)
Camera RED (lights on)

 Camera
BLUE (lights on)
Camera
BLUE (lights on)
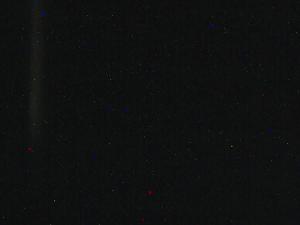
This final experiment led me to formulate a theory as to why the camera has been behaving as it has with the images I generated on the monitor. I first generated a black image with rgb values of (0,0,0) and displayed it on the monitor. I took a picture of the image with the camera and then turned off the monitor completely and took another picture with the camera of the blank monitor surface. Both appears black yet when the camera outputted the images on the screen, they appear quite different. As can be seen below, the Black surface that was generated on the monitor appeared to be BLUE while that of the blank monitor remained loyal to its true color, BLACK.
Generated BLACK Surface

 Blank
Monitor
Blank
Monitor